|
|
|
hidden hitch |
1. Remove dust cover (1) by gripping cover releases (9) and pull cover out and up.
2. Set drawer dials to opening combination (factory default 0-0-0-0)
3. Remove drawer by pushing down on drawer release (2)
4. Remove both pins (5) and foam washers (6) and insert HitchSafe into your hitch receiver (3)
5. Insert HitchSafe and line up its pin holes with receiver’s (3) pin holes. You may need to remove one of the foam spacers.
6. Pull out both pin retaining bars (4) to their fullest extent
7. Insert pin (5) and foam washer (6) into hole of receiver/HitchSafe. Push the sliding bar (4) in so that the bar locks pin in place by fitting into groove on the end of pin.
8. Insert combinated drawer (see “Combinated Drawer Instructions” on opposite side). Make sure drawer release lever (2) is up to latch and then scramble dials.
9. Place the top part of dustcover (1) so metal hooks at top fit into slots on top of HitchSafe flange. Click solidly into place bottom cover releases (9) into their corresponding slots at bottom of HitchSafe flange. |
|
View Installation Video Below |
|
|
|
Hidden Hitch
 hidden hitch
 |
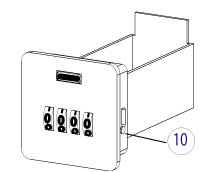
1. Set to current opening combination (new from factory default is 0-0-0-0)
2. Test to make sure you are on opening combination by flipping down drawer release (2)
3. Turn reset screw (10) clockwise 90 degrees to vertical position

4. Set dials to your desired opening combination. Write this number down!
5. Return the reset screw counter-clockwise to horizontal position

6. Check the dials to be sure you have your correct number and then TEST YOUR COMBINATION before placing it into the HitchSafe by scrambling the dials, setting it to your combination and then confirming the drawer release flips down.
Storing Credit Cards/Driver’s License
There are grooves in the drawer and in the HitchSafe body that will accommodate up to 2 cards (Driver’s license & credit card) when placed in a right hand angle “/” Do not try to force more than two cards as the slots only allow room for two.
Notes: The drawer can only be inserted into HitchSafe when the correct combination is set - The dials can only be turned when the drawer release (2) is in the up position.
- HitchSafe is not responsible for lost or
misdialed combinations.
- When changing the combination always test the combination prior to inserting the drawer into the HitchSafe.
- Write your number down & keep in safe place. The HitchSafe is secure with 10,000 possible combinations so do not lose your number! |
|
View Setting Combination Video Below |
|
|
|